Handling fire restoration by yourself can be a difficult task. It’s hard to know where to start repairing fire damage; it seems like you need to do everything at once.
We decided to break down the process into 14 bite-sized chunks to help you stay focused on the next goal. Focusing on one small step at a time is the key to quickly getting your life back in order.
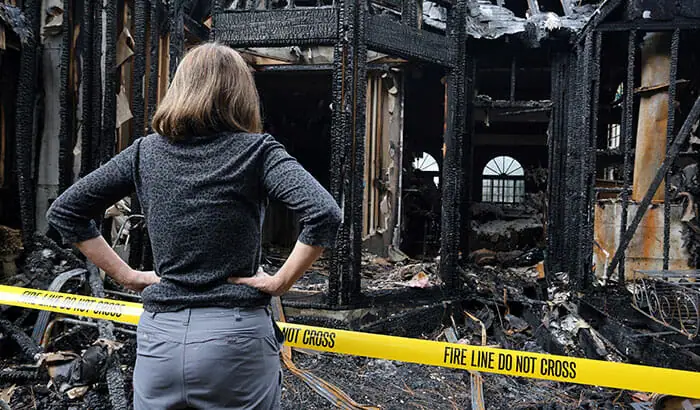
1. Contact your insurance company to report the fire damage and begin the claims process.
Getting a hold of your insurance company as soon as possible after a fire is a priority. If you want to have your home repaired in a timely manner, start the claims process and get the repairs underway.
You should provide your insurance company with all the necessary details about the damage caused by the fire, including the date and time of the incident and any police or fire department report numbers.
Your insurance company will likely send an adjuster to assess the damage and determine the cost of the repairs, so it’s important to have documentation and photographs of the damage ready for their inspection.
2. Hire a professional fire damage restoration company to assess the extent of the damage and create a plan for repairs.
Hiring a professional fire damage restoration company is vital as they have the expertise and equipment to properly assess the extent of the damage and develop a plan for repairs.
They can also help you navigate the claims process with your insurance company, ensuring all the necessary repairs are covered.
Professional fire damage restoration companies have the knowledge and experience to safely clean and restore your property, ensuring that it is safe to live in again.
3. Remove any items that can be salvaged from the property and store them in a safe location.
Removing any items that can be salvaged from the property as soon as possible after a fire is essential to minimize further damage. This includes clothing, furniture, and other personal belongings that may have been affected by smoke or soot but can still be cleaned and restored.
Remember to store these items in a safe location, such as a storage unit or a friend’s house, until the repairs are completed and you can move back into your home.
4. Secure the property by covering any openings with tarps or boards to prevent further damage.
To keep your home safe from additional damage from the elements, secure vulnerable parts of your home. This includes covering any openings in the property, such as windows and doors, with tarps or boards to protect the interior from rain and other elements.
It’s also a good idea to have a security service to monitor the property and keep it secure to prevent any looting or break-ins. This will ensure that the property is protected and ready for repairs as soon as possible.
5. Remove any debris from the property, such as ash and charred building materials.
Cleaning out debris can be a dangerous task, as ash and charred materials can contain harmful chemicals and toxins. It is best to wear protective gear or leave it to the professionals who can safely clean up damaged items.
6. Dry out the property using dehumidifiers, air movers, and fans to remove any remaining moisture.
Drying out the property can prevent further damage, such as mold growth. You can achieve this by using equipment such as dehumidifiers, air movers, and fans to remove any remaining moisture from the property.
This process can take several days or even weeks, depending on the extent of the damage, but it’s essential to be patient and allow the equipment to work effectively.
It’s also important to monitor the moisture levels in the property regularly to ensure that it is completely dry before proceeding with the next steps in the restoration process.
7. Clean and sanitize the property to remove any soot and smoke damage.
Cleaning and sanitizing the property is an important step in removing soot and smoke damage caused by the fire. This process involves using specialized cleaning solutions and equipment to remove soot, smoke, and other contaminants from the surfaces on the property.
Soot and smoke can penetrate various surfaces, such as walls, ceilings, and ventilation systems, so it’s necessary to thoroughly clean and sanitize the entire property. This will help eliminate any unpleasant odors and ensure the property is safe to live in again.
8. Address any structural damage to the property, such as damaged walls or roofing.
Fixing structural damage includes repairing or replacing any damaged walls, roofs, and other structural elements that may have been affected by the fire.
9. Replace any electrical wiring, plumbing, and HVAC systems affected by the fire.
Repairing and replacing these systems is necessary to ensure the safety and functionality of the property, as these systems may have been damaged by heat, smoke, or water used to extinguish the fire.
10. Install new drywall, paint, and flooring as needed.
Your flooring is likely damaged and discolored or harboring lingering chemicals and toxins from the fire. Removing and replacing your flooring will help your home look fresh and clean, yes, but it will also keep you and your family healthy as it won’t contain any toxins.
11. Inspect the property for potential health hazards, such as mold, and address them accordingly.
Fire and water damage can create the ideal conditions for mold growth, so it’s essential to address any mold issues as soon as possible. Mold is a problem that can have cascading effects if left unchecked. Be sure you aren’t making any repairs in areas where mold still resides.
12. Check and restore the Fire Alarm system, Smoke detector, and other safety equipment.
Checking and restoring the fire alarm system, smoke detector, and other safety equipment helps to ensure the safety of the property’s occupants.
This step includes testing and replacing any smoke detectors, checking the function of the fire alarm system, and replacing any other safety equipment that may have been damaged or affected by the fire.
13. Conduct a final walk-through of the property with the restoration company to ensure all repairs are complete and satisfactory.
The walk-through should include a review of the repairs made and a checklist of items to ensure that everything has been completed to the agreed standard.
It’s important to thoroughly review the property and bring up any issues or concerns to companies and contractors making repairs to address them before you move back into the property.
14. Move back into the property once all repairs and restoration work is completed.
The final step in the fire damage restoration process is moving back into the property once all repairs and restoration work is completed. Be sure your home has been cleared to live in before taking up residence again.
It’s a good idea to schedule a final cleaning before moving back in to ensure that the property is free of any dust or debris left over from the restoration process — this will allow you and your family to start living in a safe, clean, and comfortable home again.
Repair Your Fire Damage in One Step With Bull Matrix Restoration
If you’ve recently experienced fire damage in your home, don’t hesitate to call Bull Matrix Restoration.
Our team of experts has the knowledge and experience to handle all 14 steps of the fire damage restoration process, from assessing the damage to moving you back into a safe and comfortable home.
With Bull Matrix Restoration, you can make the fire damage restoration process a one-step process, just contact us, and we’ll take care of the rest.